This post is by Paula Jakubik, the Community Manager at Pixc.
High quality product photography makes all the difference in ecommerce. Most sellers know that, but achieving it is not an easy task.
In this guide, I’ll cover all the essentials you need to know about ecommerce product photography. You don’t need to be a photography geek to get fantastic results, but you do need some crucial basics – and plenty of practice.
I’ll also explain the photo policies set by eBay and Amazon, which you must follow if you sell on those marketplaces, and special considerations for photographing difficult products: jewelry, clothing and large items like furniture.
I hope this guide helps you get on the path to some really awesome product photos and – most importantly – increasing your online sales. Any questions? Please fire away in the comments at the end!
[generalCTA text=”View Top Photo Editing Services” url=”http://www.webretailer.com/reviews/category/international-outsourcing/?category=6311″]
General product photography tips
Shoot against a white backdrop
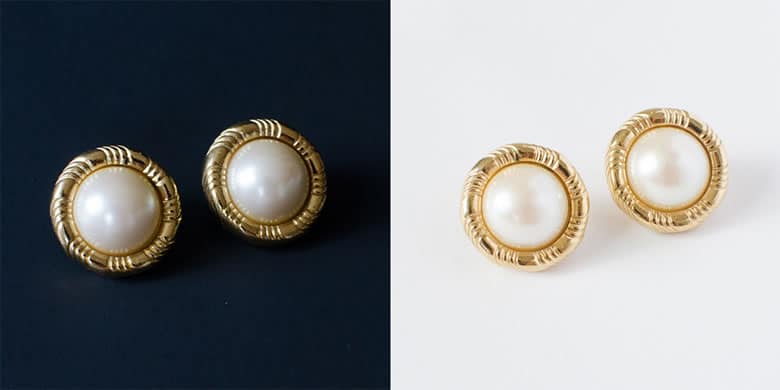
A white backdrop will make all the difference when you shoot your products. First up, it’ll reflect white light onto your product, which will help you produce a well-lit photo and really bring out the product’s color. Shooting on white will also help you avoid any color spills.
A white backdrop will also help ensure your camera’s white balance calibration is on point. Light sources have different color temperatures (measured in Kelvin) and while our brains can adjust to these temperatures automatically, a digital camera can only guess the true color of everything in the frame by using a white element as a reference point. By surrounding your product in white, you’ll be able to capture its true color and accurately represent your product.
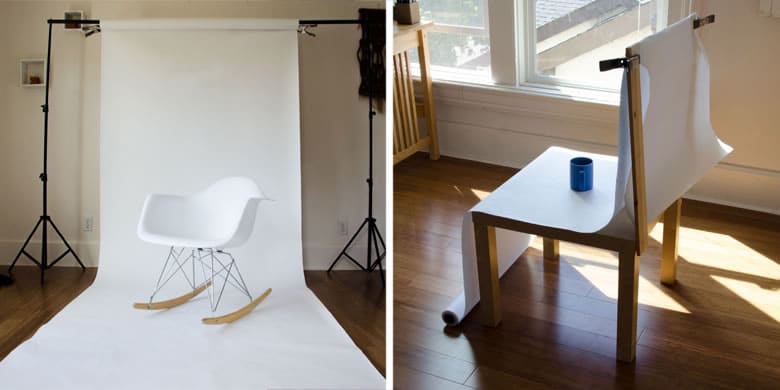
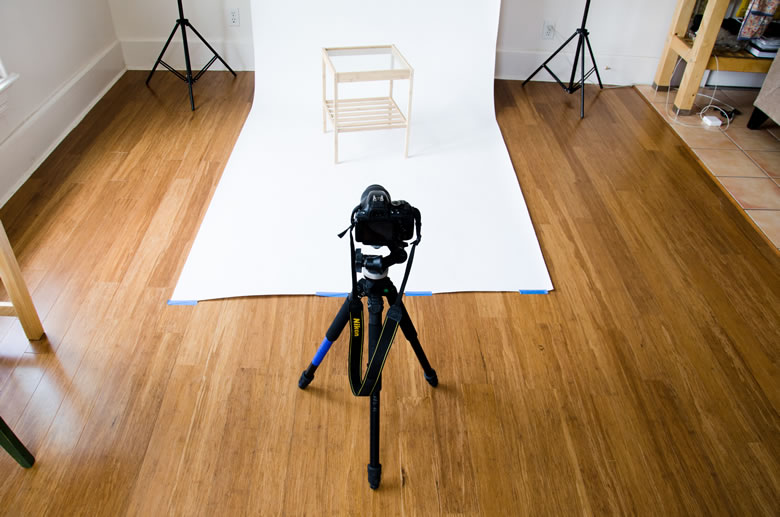
The best kind of backdrop is a photography sweep, which is simply a backdrop that seamlessly transitions from the vertical to the horizontal surface. The sweep should be larger than your product and fill up the entire camera frame.
If you’re photographing smaller products, a shooting table is the best option because you’ll have more flexibility in terms of where you can set up. You can easily make your own by nailing two scrap pieces of wood to the back of a small table and clamping your sweep in place. White wrapping paper works really well because of its reflective quality, but anything clean and white will do.
If you’re shooting large products, investing in a professional sweep isn’t a bad idea, especially if you’re going to shoot frequently. It’ll come with a stand so you can easily set it up. Otherwise, you can improvise by attaching a sheet to a wall or draping it over something.
Use sufficient lighting
Sufficient lighting is the secret to high-quality product photography. Unless you know what you’re doing, stay away from professional, artificial lighting. It takes a long time to master and you’ll need a lot of equipment. Stick to natural lighting — it’s free and easy, and it can produce great photos if you use it correctly.
You want to use the sun indirectly, so the best place to shoot is near a window. You might want to diffuse the light further by covering the window with a white sheet or taping white paper over the window pane. Note that using any other color to diffuse the light will change the temperature of your light source.
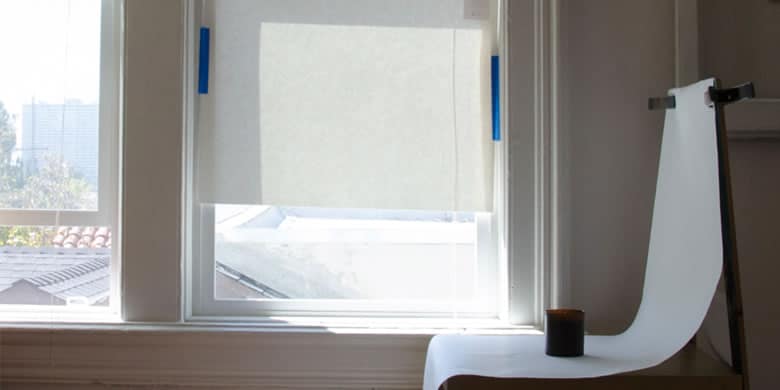
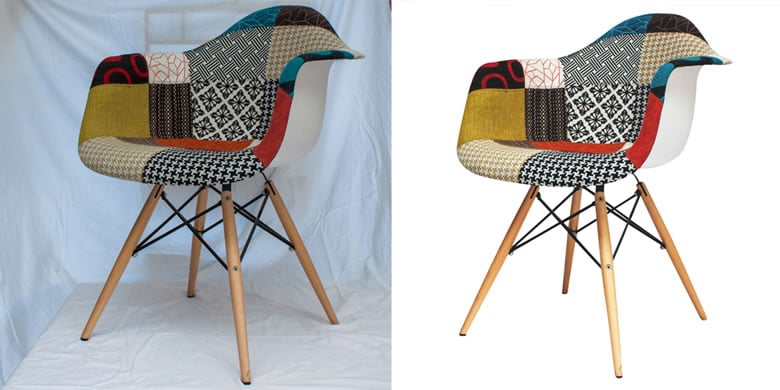
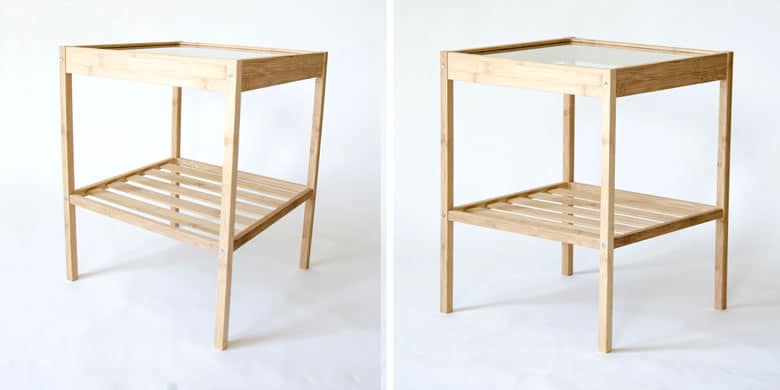
The window should be positioned to the left or right of the product — never behind or facing the camera. This means the light will only hit the product from one side so you might need to use a fill light, which is just something you place on the opposite side of the light source to prevent harsh shadows and evenly light up the product. If you look at the two photos below, the shadows in the left chair are much darker, particularly on the underside of the product.
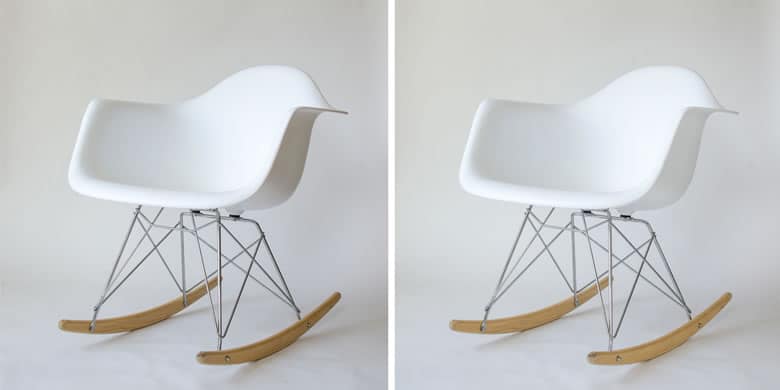
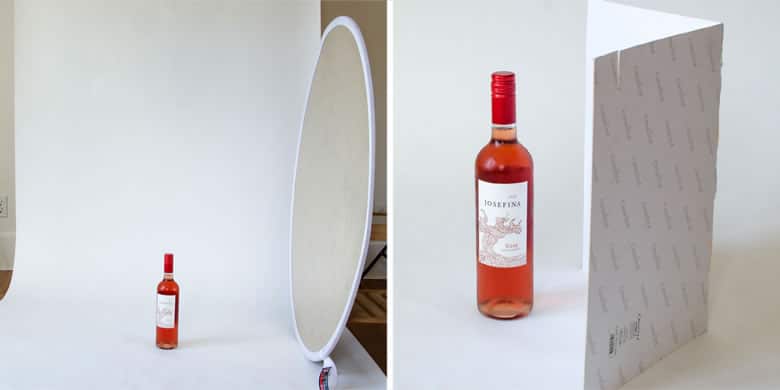
You can also buy a reflector (a professional fill light) or make your own. Simply grab a white piece of cardboard and fold it in half — the shinier the surface the better. Alternatively, you can use a regular piece of cardboard and cover it in aluminum foil.
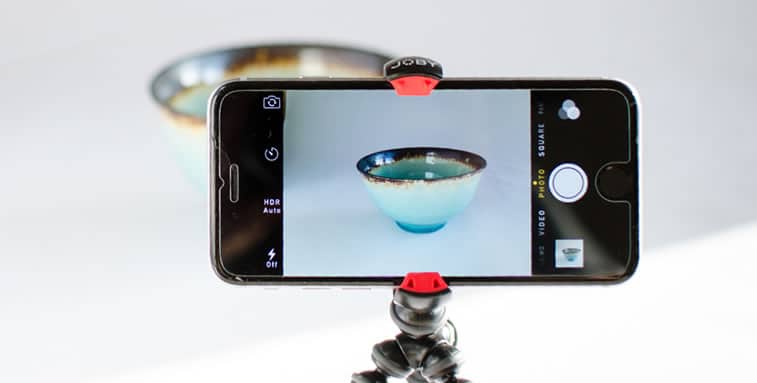
Stabilize your camera
Stabilizing your camera will help you take clear, sharp images. The best way to stabilize your camera is to use a tripod (or a smartphone mount if you’re shooting on your phone). When it comes to tripods, you get what you pay for, but as you’re only shooting product images, you won’t need anything too fancy. There are many under $50 on Amazon.
Understand your camera
Photography is a very technical and complex field, and there’s a lot to learn when it comes to cameras. You don’t need to be a highly skilled photographer to take a product image that sells, but the first step in improving your product images is to learn how your camera works so you can make the necessary adjustments for better photos.
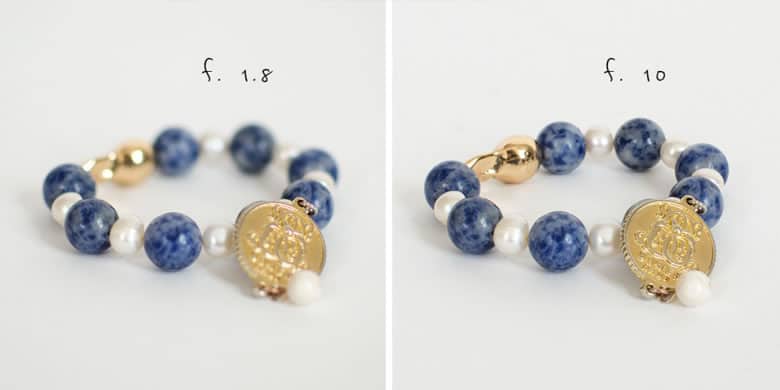
If you’ve invested in a DSLR, learn the basics of shooting manual. Your aperture is the hole within the lens that determines the amount of light that travels into the camera. It’s measured in f-stops and (this is the confusing part) the higher the f-stop number, the smaller the aperture. The aperture is also linked to your depth of field, which determines how much of the shot is in focus. A smaller aperture will capture everything in the frame, and a larger aperture will isolate the foreground from the background.
The shutter speed refers to how long the hole in the lens is open for, i.e., how long light has to travel through the lens. A smaller aperture lets in less light, so the shutter needs to be open for longer to produce a well-lit photo.
The ISO determines a camera’s sensitivity to light. The higher you go, the lower the quality of the photo. Never exceed 400 — you’ll see that the image starts to get grainy. This is called camera noise. If you can’t take a well-lit image with an ISO of 100 or 200, you need to increase the lighting, make the aperture larger or slow down the shutter speed.
Ultimately, the perfect aperture-ISO-shutter speed combo will depend on your setup and your product, but a basic understanding of each feature will help you figure out what to adjust.
You can also take high-quality product images on any new smartphone. Sure, you get what you pay for, and DSLRs definitely take much better photos, but there won’t be a huge difference in the end result unless you really know how to use a DSLR to its full potential.
The most important thing to remember when shooting on a smartphone is the phone camera adjusts to its environment. You can’t adjust the aperture, but you can choose a focal point by tapping on the screen. Smartphone cameras automatically adjust the ISO to the lighting conditions, so you’ll need a lot of lighting to keep it below 400. Alternatively, there are Android and iOS apps that give you control over this feature.
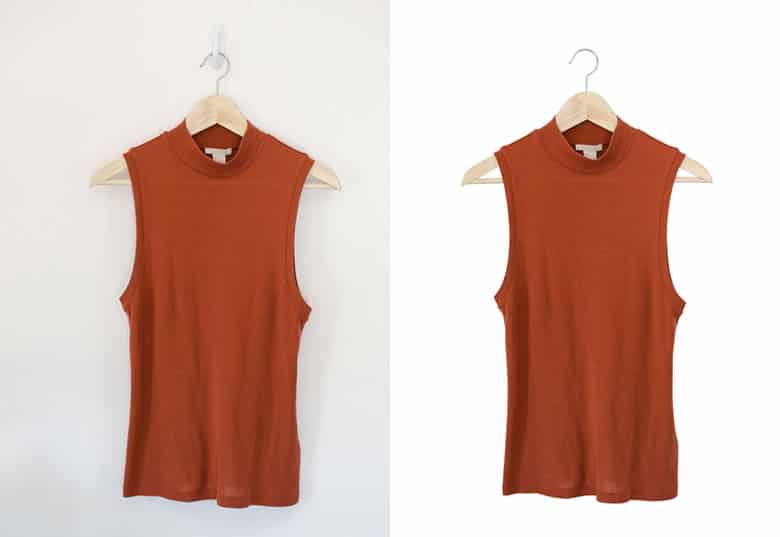
Remove the background
Removing the background is an easy way to give your products a professional touch. The appropriate background color will depend on the design of your store, but white is the best option in most cases because it doesn’t clash with any other color and draws attention to the product.
There are a few ways to remove the background from a photo, some harder than others. Generally the most difficult approaches yield the best results — the pen tool in image editing software like Photoshop works wonders and will give you a really accurate outline. You can try using alternative tools like the magic wand, but more often than not it doesn’t cut away the background in the right places, and sometimes cuts into the product.
Use a template
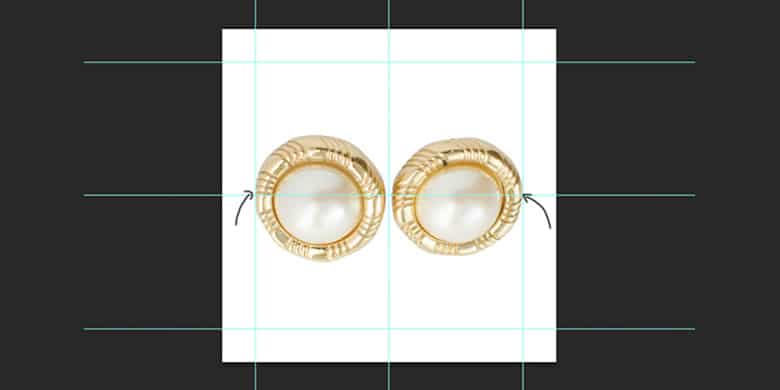
Consistency is key when it comes to product photography. Your products should all take up the same amount of canvas space, so when they’re displayed together, they are more or less aligned.
The best way to do this is to create a template. Create a blank file in any kind of photo editing software that has this basic function, and choose the size you want for all of your product images. The best size is anywhere between 1000 pixels to 1600 pixels on the longest side, but different platforms will have different requirements, so look out for those.
You’ll then need to paste all of your images into the template, resize them accordingly and save them as new files. Your products should take up the majority of the canvas; aim for 80-95% of the frame. If you’re using a more advanced photo editing software like Adobe Photoshop, you can create guides that will help you align your products exactly, which is definitely more effective than eyeballing it.
Note that you can’t increase the size of a photo, and stretching it will only make it blurry and pixelated. If your original photos are too small for your template, you should reshoot the products or make the template smaller.
eBay and Amazon image policies
If you’re selling on Amazon or eBay, you’ll need to stick to their product image requirements for your listing to go up. The most important thing to note is that to satisfy the image requirements for both platforms, your images need to be at least 1000px on the longest side, but I’ll go into more detail below.
And, if you’re not selling on either of these platforms, remember that Amazon and eBay are leaders in ecommerce. They know what sells, so it’s probably a good idea to take a leaf out of their book when it comes to product photography.
eBay
eBay’s product image requirements are pretty easy to follow. They require images to be at least 500 pixels on the longest side. That being said, if you want to enable a zoom function, eBay requires images to be at least 800px on the longest side.
eBay does not allow borders or text on images. It allows watermarks, but they need to have an opacity of no more than 50%, can’t obscure an item and should not take up more than 5% of the frame. In my opinion, product images look better without watermarks anyway.
You can also use stock images or supplier images on eBay if you’re selling a brand-new item, but make sure you have the right to do this. Check the conditions of use on the original photos.
Amazon
Amazon has strict product image requirements, and your images will be rejected if the requirements are not followed. Note that the main photo must be of the product only, with the full product in the frame and taking up 85% or more of the canvas (save your pretty in-context shots for additional “other view” images and social media). The background must be pure white (#ffffff) and the product needs to be in focus, professionally lit and with realistic colors.
When it comes to the image file itself, Amazon requires images to be at least 1000 pixels in either height or width. You can upload TIFF, JPEG, GIF or PNG files, but JPEGs are easiest to work with and are the default file type for photos. You need to be extra careful when naming your files; a file name needs to include the product’s ID, and can only be made up of letters and numbers. The image won’t upload if there are spaces, dashes or other characters in the file name. You also need to include the appropriate file extension (for example, .jpg or .png).
Product-specific tips
Jewelry
On one hand, jewelry can be pretty tricky to photograph because it’s small and highly reflective, and in most cases it doesn’t stand up on its own. On the other hand, the studio setup for photographing jewelry requires very little space, which means you can pretty much shoot it anywhere. Props are your best friend for jewelry photography — you’ll need to get creative and figure out what works best for your product.
Shooting against a white backdrop is more important than ever when it comes to jewelry, particularly for shiny or transparent pieces. Every other color will spill onto the product, and your camera might have trouble focusing against a darker backdrop.
One of the issues with jewelry being so small is that it’s often hard to get the entire product in focus. If you’re just starting out, you may find that the edges of your product are out of focus. If you have a DSLR, shoot with a small aperture and a slow shutter speed. The aperture will keep the product in focus, while the slow shutter speed will keep the image nice and bright and allow you to use such a small aperture.
Necklaces
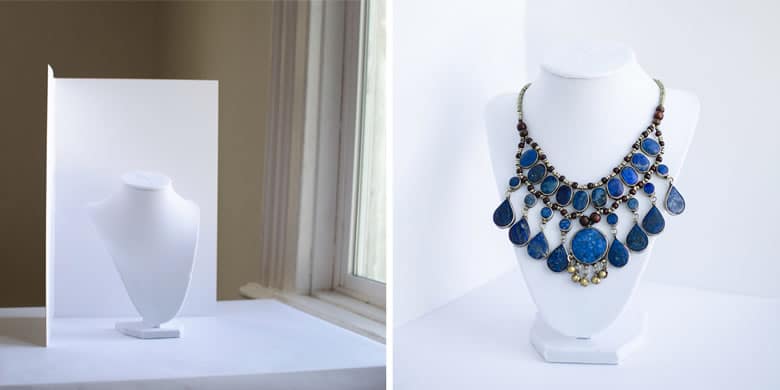
The best way to capture a necklace is to use gravity and let it hang, the same way it would lie on a body. For long necklaces, jewelry busts work great because they’re easy to use and stand up on their own. For best results, the bust should also be white, but you can cover a different-colored bust with a white sheet for the same effect.
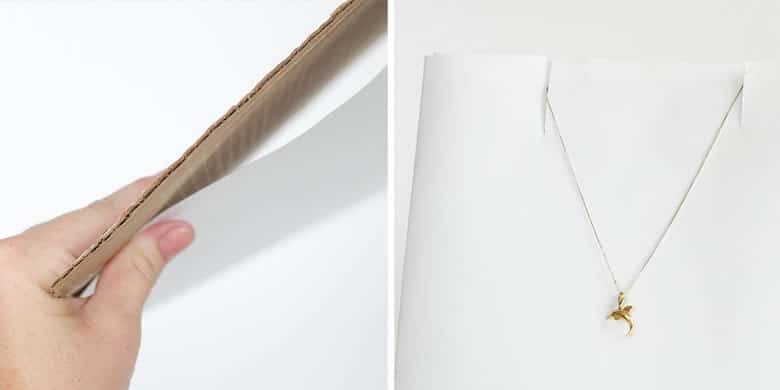
The issue with using a bust for a short necklace is that at least half of the chain will get cut off behind the mannequin, and this will leave you with a strange photo after you remove the background. The best way to shoot short necklaces is to make yourself a flat jewelry stand with some cardboard and a white piece of paper. You can rest it against a photo frame or easel to stand it up.
Bracelets
Bracelets should be photographed either from directly above, or from the front and slightly above. It’ll depend entirely on the product; more delicate pieces tend to look better from above, whereas pieces with a bit of height tend to look better from the front.
Earrings
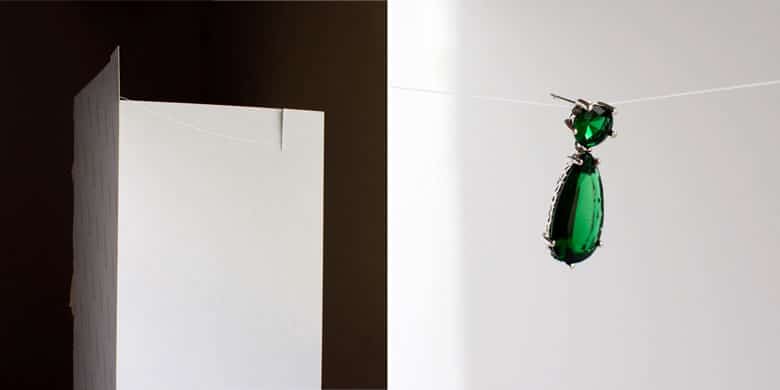
Dangling earrings should hang in the product image. If you want to shoot them straight on, use the same kind of DIY flat jewelry stand as you would for a short necklace and pin the earrings to it, or use fishing line.
Rings
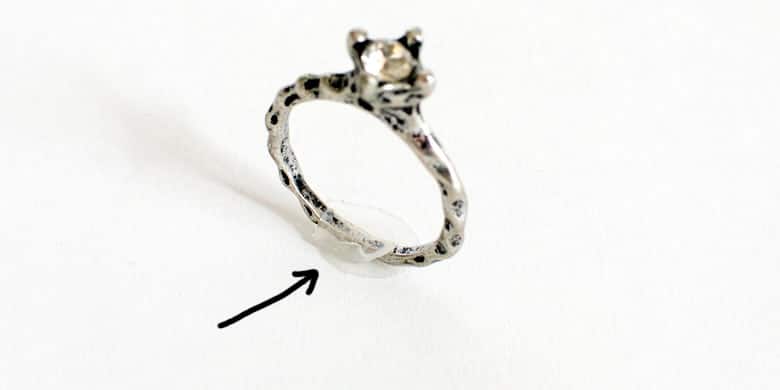
Rings can be shot from most angles, but you should pick an angle and stick to it for all your photos. Note that if your rings have a decorative element at the front like a pattern or gemstone, it should be the focal point of the product shot.
You can use clear glue dots, double-sided tape or Blu-Tack to keep rings in place.
Clothing
The hardest part of shooting clothes is deciding on the style of product image you want. Shooting on a model can help emphasize the style of your product if you find a model who embodies your brand values. However, this will limit your brand to a specific target market, and working with models doesn’t give you as much flexibility as you’ll need to find a mutually convenient time and place.
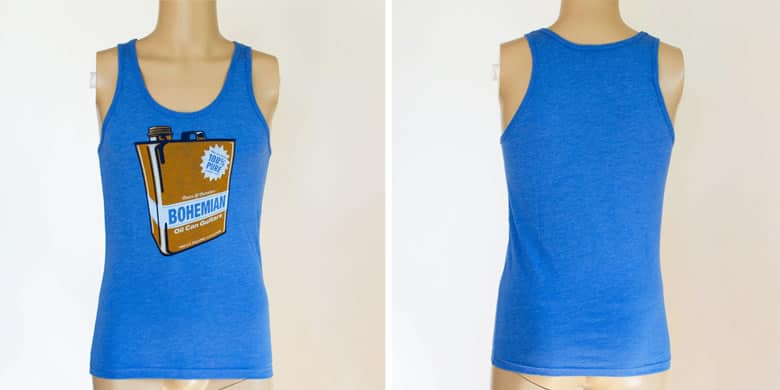
Shooting on a mannequin will give you a lot more freedom and will keep the focus on the products themselves. When choosing a mannequin, make sure you choose one that is standing ‘straight on’, as your product will look funny when you remove the background if the model is standing with her hip out or her arm on her waist.
If you do shoot on a mannequin, you should consider creating ghost images. They’ll give your products shape and dimension, and give your images a professional touch. To create a ghost image, you need to take a photo of the front of the clothing and a photo of the back inside out, and then digitally stitch them together.
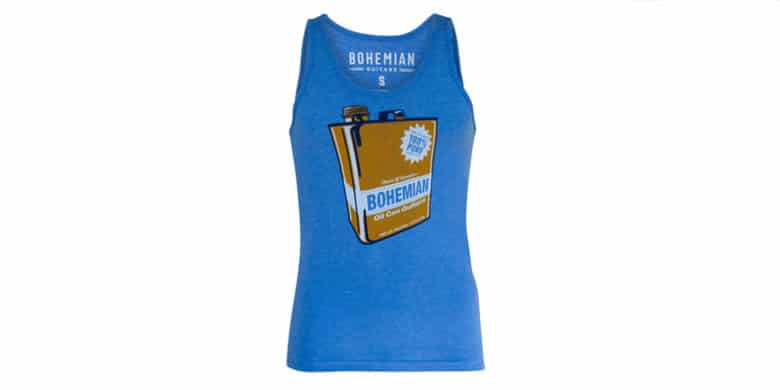
Alternatively, you could shoot your products ‘flat’, either on the floor or on a hanger. This is the easiest and cheapest way to shoot products, but this method makes it harder for the customer to visualize how the product will look when worn.
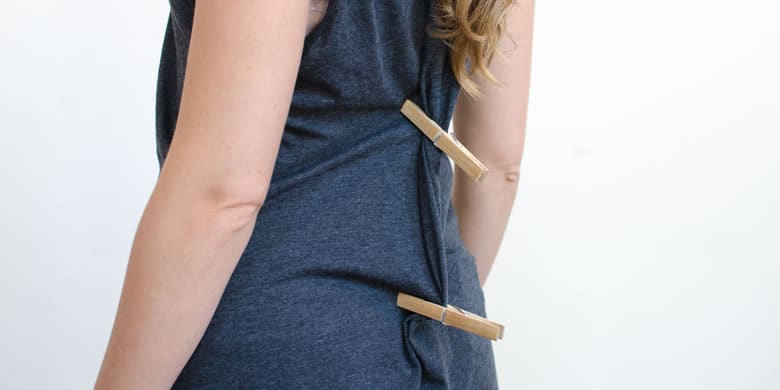
Make your life easier by having a couple of props on hand. Safety pins are great for keeping little things in place, while clothespins/pegs are great for improving the fit of the product. You should also keep an iron on hand to make your products look clean and wrinkle-free.
Large items (e.g. furniture)
The biggest issue with shooting large products such as furniture is the amount of space they take up. You’re going to need a space that’s at least three times as large as the product, along with ample lighting. A well-lit room is your best option, as direct sunlight will create harsh shadows. As mentioned earlier, buying a sweep will make your life a lot easier, particularly for products this size. You should also get a friend or co-worker to help you to move the heavier and bulkier items around.
If you’re using a DSLR, the trick is to stand far away from the product while zooming in as much as you can so your focal length is at its maximum. Shooting with a smaller focal length when you’re closer to the product may leave you with a slightly distorted product in the resulting photo. To get the entire product in focus, make sure you use a small aperture.
Although it’s best to shoot from the front for most products, furniture can be a little different. The best shot is usually one that captures the front, top and side of the product, so shooting from above and slightly to one side of the product is a good place to start. This angle helps people better visualize the product and gives the product some dimension.
Now it’s up to YOU!
Nail your setup, grab your camera, and give DIY product photography a go. Practice makes perfect, so don’t give up if your product images aren’t perfect the first time you shoot — it’ll take some time to figure out what works best for you given the equipment you have and the products you’re shooting.
Do you have any DIY product photography tips of your own? We’d love to hear them! Leave a comment below and share the knowledge!
This post was by Paula Jakubik, the Community Manager at Pixc. Pixc provides on-demand product image editing for ecommerce stores in under 24 hours.
[generalCTA text=”View Top Photo Editing Services” url=”http://www.webretailer.com/reviews/category/international-outsourcing/?category=6311″]

Very informative and useful.