This post is by Danny McMillan, a London-based Amazon Seller who sells in Europe and the US.
Imagine the situation: you’ve decided to sell a new private label product on Amazon. You find a supplier, agree the details, and place an order with them. You receive the units, create a great listing on Amazon, get some Sponsored Product Ads running… and then the problems start.
Your product just isn’t selling. Maybe your average cost per click is three times what you expected. Maybe your product turns out to be inferior to your competitor’s version. Or maybe there is simply no market for it and the units won’t move whatever you do.
These kind of problems are common, but can often be avoided. If you test the product and the market before committing to a big order, you can discover and fix a lot of problems, and change your approach before taking on stock. This is an organic method, based on testing a number of different factors in your chosen product category. Your results may differ if you are planning on a large scale launch with hundreds of giveaways.
There is a misconception that product testing is costly and time consuming. That doesn’t have to be the case, as you will see in this post. I’ll show you some of my favorite product testing hacks, which will help you generate rich and accurate market data, create better products more quickly, and carry out sample tests to save you a lot of money further down the line.
1. Find popular products using AMS
Amazon Marketing Services (AMS) provides valuable access to Amazon’s marketplace data. You can use it for keyword research that will show you which products are popular and which aren’t, and save you from wasting time and money testing items that have no market.
The first step is to get access to AMS.
Using Vendor Express to get into AMS
UPDATE 14 MARCH 2018: Amazon has announced that it is closing Vendor Express.
You can only access AMS through Vendor Central or Vendor Express. Vendor Central is invite-only, but anyone can apply for Vendor Express. Both of these programs are for businesses who want to sell products directly to Amazon, wholesale, that will then appear as “sold by Amazon”. You have a lot less control over pricing (and other factors) than when you sell through the marketplace yourself, but that doesn’t really matter here – all you are doing is trying to get access to AMS. Never use Vendor for a product you would want to sell yourself in the future. Getting back control of your listing is a world of pain.
To be accepted in Vendor Express you have to offer a product to Amazon. So your first step is to go to AliExpress and find a cheap product, for example a stove protection cover or vibration pads for washing machines. Don’t overthink this part as your goal isn’t to make loads of money from this product, it’s to get into AMS. Just breaking even from this product is fine.
Something to remember when sourcing a product is to make sure you can get a proper invoice from the supplier. When you come to offer the product to Amazon they may want to see a proof of purchase, and a standard receipt won’t cut it. Use the messaging system on AliExpress and make sure that the supplier can provide you with a proper invoice.
Once you’ve selected a product, go through the steps in Vendor Express and create a listing, as you would if you were listing on the Amazon marketplace. Make sure your listing contains an image on a white background, and develop out the keywords so that Amazon are more likely to take the product. Basically, at this stage you want to show Amazon you are making an effort; so invest time populating the fields and completing them as required.
When you come to offer the product to Amazon you have to determine your asking price. Make sure you’ve worked out all your costings and once again, aiming for break even point is fine.
Amazon will then review your product and, if you are successful, ask you to send in some samples. In most cases they ask for 12 free samples, but you can just ship half of those by updating the sample amount column.
Once Amazon raises a purchases order for your product, you’ve been accepted into Vendor Express and should be able to access AMS. Don’t overthink the whole process – you’re not trying to find a best-selling private label product, you’re just offering a product to an algorithm to get into AMS!
Using AMS to generate keyword data
AMS is a great platform with three different advertising options: Sponsored Product Ads, Headline Search Ads and Product Display Ads. Remember that you aren’t actually going to pay for advertising, it’s just the data you want to access. At the time of writing, Amazon are rolling out Headline Ads in beta on Seller Central to large accounts. So one day you could potentially do this part of the process in Seller Central, if Amazon provide the same level of data there.
In this example we are going to be using a Headline Search campaign, which is the wide banner you often see at the top of search results on Amazon. You need three products to create a Headline Search ad, so choose any three products (they don’t have to be your own) and set a budget.
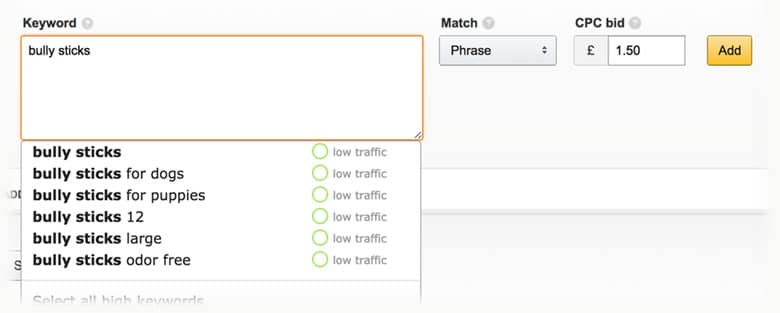
Once you put a budget in, a panel appears below and allows you to add keywords. As you start typing, you will get suggestions. As I start typing “bully sticks”, a list of suggestions appears with a traffic score for each one, which can either be low, medium or high. For “bully sticks” the traffic score is low, but for the related term “dog chews” the score is medium.
The traffic scores are a great way to find out which products are more popular. It doesn’t give you detailed numbers, but it does give an indication. I recommend you stick to products with medium and high traffic.
However, remember that traffic varies by category. If you’re in the science category, most keywords are likely to have low search traffic because the category doesn’t get the amount of sessions and conversions that home and kitchen does, for example.
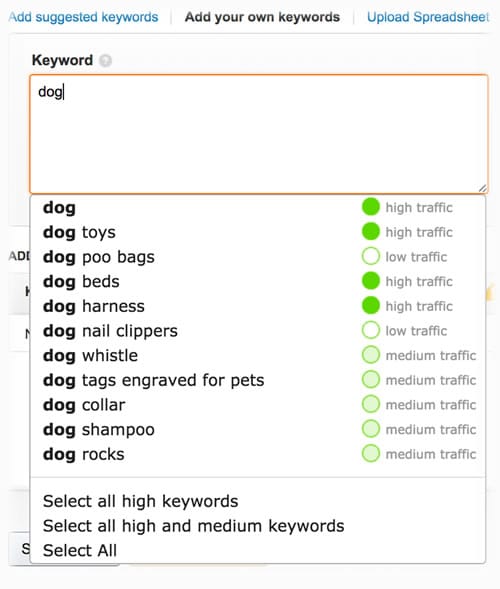
With these searches I generally find that broader is better, so I use single words such as “dog”. This allows me to start building up keywords, without missing any important ones, because it gives a wide view of what dog-related products people are searching for. For example, I can see that “dog toys” are high traffic whereas “dog nail clippers” are low.
You may find by searching keywords that the product you are planning to sell does not have a strong market. This is handy, as it means you can stop working on a product long before putting time and money into it. Instead you can change track, and look at the products that do have good traffic and see if your supplier makes those instead.
2. Improve your competitor’s product
When sellers are looking for suppliers, they tend to spend a lot of time negotiating with factories and narrowing down who they are going to deal with. Then they’ll get some decent prices and make the decision to order a sample. But by the time they receive the sample, they often find they’ve wasted a lot of time because it turns out to be very poor quality.
My suggestion is to work from the other direction: don’t get a poor quality sample that needs a lot of changes, find a finished product you already like and make some minor adjustments.
Start by buying two or three of your competitors’ products and doing an analysis of them. Always make sure you highlight the positives of those products, as well as the negatives – you want to make sure you keep the good aspects the same. When looking at the negatives, it’s a good idea to check product reviews as well as analyzing the product physically yourself.
With this approach, when you contact the supplier, you already have a good idea of what your product should be like and can ask them for a quote to meet that standard rather than producing a sample from scratch.
3. Run some dummy PPC ads
One of the biggest costs you are going to incur when launching a product, is going to be your pay per click (PPC) costs. It’s always good, if you can, to find out the cost per click upfront and include it in your estimations. Most sellers don’t do this until they have products in stock, and then get a nasty surprise when the cost per click is much higher than they expected.
When I test PPC costs, I start by creating a listing with my main keywords. I tend to choose two or three keywords and weave them into the title of my listing. I set the listing as merchant-fulfilled and say I have a few units available so it goes live once it has propagated through the system. I then make my price with shipping around 60 percent higher than my competitors, as I don’t want anybody to buy the product – it’s a test listing on a throwaway UPC. Finally, I create a manual Sponsored Products campaign and enter my main keywords.
Once my listing is live and indexed in search, I’m going to get up early and start clicking on my own ads. This probably goes against what most sellers would expect, because when I click, it’s going to cost me. But it will save me money in the long run, because I’ll find out the actual cost per click as opposed to Amazon’s suggested bid.
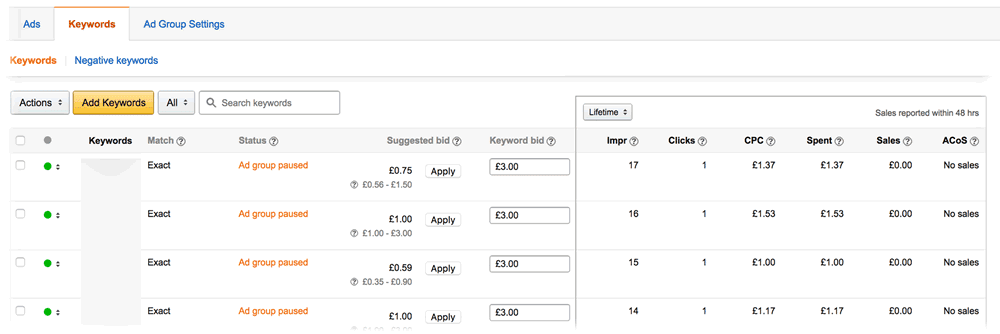
Let me give you an example. In the picture above I wanted to get a rough estimate of the average cost per click. I know this is a moving target, and that it will change from week to week, but what I’m trying to do is avoid being caught out.
So, I started with a £10 bid, then realized I was in first position and dropped it down to £5. I waited a bit longer this time and then, when I was still in first position, brought my bid down to £3 – and that’s where I left. Essentially, I did this just to make sure there was no one bidding crazy amounts.
With my bid at £3 and in the number one position, I found that Amazon’s suggested bids were almost exactly the same as the actual cost per click. This isn’t always the case though and sometimes Amazon gets this crazily wrong, leaving you with an unsustainable average cost per click…
I had this happen to me on an oversized item, that sold for above $40 in the consumables category. Amazon predicted that my average cost per click would be $1.95, but it transpired that it was actually $5.20 a click. Now this was a wholesale product so the margins were lower and it didn’t make sense to continue bidding for that keyword.
Overall, testing PPC has three main benefits to sellers:
- It gives you a rough idea of your average cost per click.
- It gives you an idea of your competitors’ bids.
- You can ensure that your listing is visible for your main keywords.
To elaborate on the last point, I launched a product last year and I wasn’t appearing for the head keywords that I wanted to use. These were the keywords with all the traffic, so in order to get some traction I needed to appear for them.
After two weeks, and lots of panicking, I managed to resolve the problem. But by creating a dummy listing you can see any issues with visibility sooner, meaning you can isolate the problem and resolve it, saving time and money when you come to launch the product.
We must remember this test is to take the temperature of the market, and captures it at a moment in time. By the time you launch, CPC can go up and new entrants can capture market share with aggressive bidding. However, this test takes 20 minutes and will give you some great insights and options to adjust your forecasting based on the knowledge gathered.
4. Source a test batch locally
When you are testing your product, it can be beneficial to avoid sourcing from China straightaway and, instead, find a local supplier. This process might be more expensive, but this doesn’t matter too much because you’re just sampling the market – you aren’t going into full launch mode.
Once I’ve got the results of the test, I send all the data generated over to my agent in China. By doing this, I can build the best first version of my product possible.
This isn’t usually the way it’s done. Sellers often create a new product based on no data at all, and wait three months for it to arrive from China. It might need two redesigns before you get to a really great product, and that could take a whole year with a Chinese supplier. By sourcing closer to home, you can run much quicker tests and get to that stage in a few months.
To find a local supplier, go to Alibaba. Yes, Alibaba, the same site you use for sourcing from China. On the left hand side of the page, use the “Supplier by Area” or “Suppliers by Country/Region” filters to search by your local area. If your search returns a huge number of suppliers, then try filtering by “Trade Assurance” and “Gold Supplier” but otherwise just use the area filter at this stage.
Sourcing locally has several benefits. Local suppliers tend to have lower minimum order quantities, and delivery is much quicker than sourcing from China – I’ve had products arrive in just a matter of days. They are also more likely to be in your timezone, and speak the same language.
5. Use DIY photography for test listings
Once you’ve sourced your test product locally, create a listing. A crucial part of this is the product photography. But, remember, we are only testing the product now and depending on the results, may decide to make changes or even sell a completely different product. If you test ten different products and get professional photography done for each, that’s going to be expensive.
Supplier images are not usually a good alternative, as they are often very poor. Even if they’re not poor, they are usually their clients’ images, and in some cases you would be in breach of copyright if you were to use them on Amazon.
Nothing will replace a great photographer for your product listing when you launch (really, nothing!), but the best alternative during testing is to take the pictures yourself. Not only does this enable you to test products cheaply, but when you start working with a professional photographer you can send them your pictures, to help them understand what you are trying to achieve.
Often sellers are disappointed with the shots they get back from their photographer as they are not exactly what they wanted. This is mostly down to communication. Learning about photography yourself has massive advantages, as you get to see through the same lens as the photographer and are much more able to articulate your requirements.
My DIY photography setup
| Camera | iPhone 7 with Camera+ App (free) |
|---|---|
| Softbox 1 | Excelvan Photo Studio Softbox Continuous Lighting Kit |
| Softbox 2 | Neewer 700W 24″x24″/60x60cm Softbox with E27 Socket Light Lighting Kit |
| Backdrop | Phot-R Professional 2×2.26m Adjustable Portable Heavy Duty Photo Studio Backdrop |
| Paper | Calumet Arctic White 1.35m x 11m Seamless Background Paper |
| Props | 3mm Gloss White Acrylic Sheet A1 |
| Options | Different colored card to suit the required shots |
I spent just under $400 on my home set up. The camera is my iPhone 7, and I have two different sets of softbox lights and a backdrop. One of the props that I use is an acrylic sheet, which gives the product a little reflection, making the image look a bit classier.
For editing the pictures, I use Photoshop and Lightroom on an Adobe Creative Cloud photography plan, which works out at $9.99 per month.
Product shots
| 1. Main Image | White background / Packaging etc |
|---|---|
| 2. Infographic | Says what product does |
| 3. Product shot | Show from angles with copy (White) |
| 4. Product shot | Show from angles with copy (White) |
| 5. Action shot | Show your product in action (props) |
| 6. Action shot | Develop the story further |
| 7. Action shot | Keep it congruent |
| 8. Product shot | Show from angles with copy (White) |
| 9. Product shot | Show from angles with copy (White) |
The type of shots you take are also important. The table above shows some ideas that I use when photographing my products. For instance, I make sure that my main image has a white background and shows the full packaging. I will use a prop if I can, although you have to be careful of Amazon’s Terms of Service.
As a curve ball, I like to include an infographic as the second image to help explain what the product does. It might have five different icons with a single word underneath each one, showing and demonstrating why they need the product. After this, I’ll use some product shots, action shots and finish with an image showing all the different size variations.
It’s really a home-based version of the professional photography I get done for the launch version of the product, getting 80% of the quality for 20% of the cost.
In closing
There are a number of ways to save time and money in the product testing process, from using AMS to generate keyword data and running dummy PPC campaigns, to sourcing products locally and doing your own photography.
When you’re going through the product testing process have clear goals for the outcomes, as these are going to determine whether your product passed or failed the test. This aspect of the testing process is very much down to you, so have clear targets in your mind from the very start.
It is also important to remember that during testing you are sampling the market, so it’s crucial that you get the best data possible. For example, price optimization is critical, because most sellers overestimate the value of their product. Focus hard on finding the right price for your product, so your data has a good chance of being actionable.
Don’t be surprised if one of your test products sells out in one day with no reviews. It won’t happen on all of your products, but the more you test the more your find out. Sometimes you hit the sweet spot first time around. There can just be a lucky correlation between your product, images, price and competition in the market.
Finally, don’t be despondent if a product fails, as that’s exactly why you carry out product testing. Find out what didn’t work and move on to the next product. By doing this, you’ve saved time and money by finding out that a product didn’t sell before you decided to stock it.
This post was by Danny McMillan, a London-based Amazon Seller who sells in Europe and the US.
Danny has previously worked in the music industry and with tech start-ups. He is now a public speaker and hosts the Seller Sessions podcast.
This post was written with Alex Knight.

The advice in this article is complete BS. The recommendations are not realistic and is guaranteed to cause your Amazon business to fall of a cliff. A huuuuge cliff.
Hi, thanks for the comment. We welcome all opinions here, including negative ones, but it would be fairer if you can be more specific - what do you mean by "realistic"?
I hope you appreciate that the advice is for product testing only, not real product launches.
Also, there's no need to reply to yourself under a different name with comments like "This guy ^^ knows whats up".